Birds In Mud

(Repost) Stubbed Toes and Blood Owies: Footprint Pathologies in Theropod Dinosaurs

Hello, Dear Readers!

Here is another post going into the highlights of one of our more recent papers dealing with dinosaur ichnology: the study of foot injuries in the fossil record!

Have you ever stubbed your toe? Pulled a muscle in your leg? Walked anywhere with a rock in your shoe? It doesn’t take major discomfort to figure out that foot and leg injuries can result in you walking “funny.” Perhaps you had to hop around on one foot for a bit. Maybe you could only take a certain length of step using your injured leg. All of the compensations that you make to avoid further or greater discomfort or pain have a good chance of being seen in your trackway. These modifications due to pelvic limb injuries also have a good chance of being preserved in the fossil record.


Tread Carefully
Of course, we have to be careful when looking at a fossilized trackway and seeing something “odd” about, for example, the gait of an animal. One aspect that can confuse people about vertebrate ichnology is that there is a HUGE amount of variation in how footprints are preserved and in how the animals themselves moved. All of that variation is perfectly normal. Dinosaurs (and any other vertebrate ambling over the landscape) are not metronomes. They are not robots. They will absolutely not take a step that is EXACTLY 345 cm long each and every time they step, or place their feet EXACTLY the same way every time. Some oddities in trackways are just that: oddities that are due to the natural variation in how a living, breathing, complex animal interacts with its environment as it moves from Point A to Point B. 


In other words, when we look for phenomena that we can call pathologies, we are looking for repeated abnormalities in footprint shape and movement. This is the framework we used to review reports of fossilized footprints that preserve oddities that cannot be explained by poor preservation or an animal being an animal.


What Is An Ichnopathology?
When we discuss pathologies, or in this case ichnopathologies, we’re talking about trauma (bone or soft tissue) that would result in an animal walking differently than it would be expected to walk. 
A pathology of the foot would result in direct preservation of the soft tissue and/or skeletal trauma that the foot experienced, such as a dislocated, broken, or amputated toe. A pathology of the lower (tibia and fibula, and muscles) and/or upper leg (femur and muscles) would result in a pace (a footstep) and stride (how the animal moves from right footprint to right footprint, or the “right-left-right” sequence of the trackway) that is different, such as a limp, shuffle, or foot drag, while the footprint itself may (but not always) look completely normal.


What Is Not An Ichnopathology?
There are footprint phenomena that are not ichnopathologies, no matter how strange they may look. Here are a couple of examples.


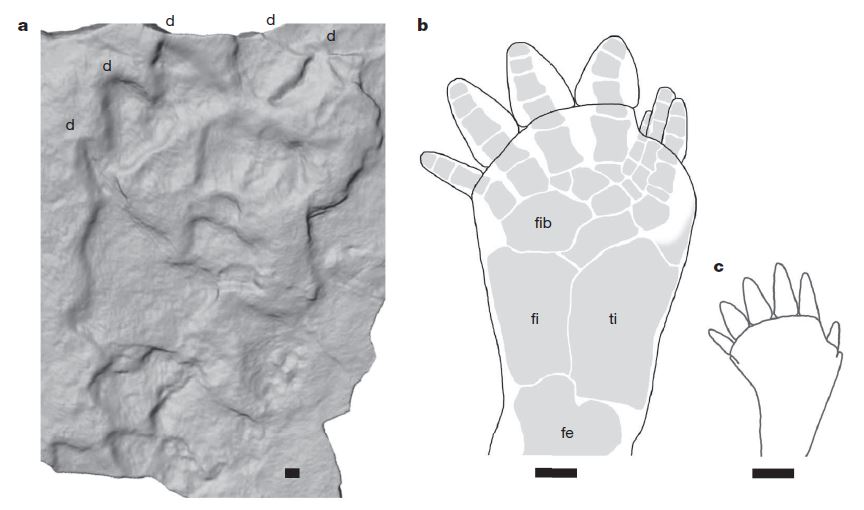
A. Missing Toes versus Natural Morphology
Here’s the danger of looking at isolated, singleton footprints. Let’s say you see a single footprint with a missing digit II (inner toe). Is this footprint the result of an injury, or is it the footprint of a dromaeosaur? It may be easy to see that the toe is missing, but looking at the trackway is essential in making an accurate interpretation of why that inner toe is “missing”.


Compare these two images:

From Abel, 1935 (McCrea et al. 2015)
Dromaeosauripus yangjingensis, Xing et al. 2012

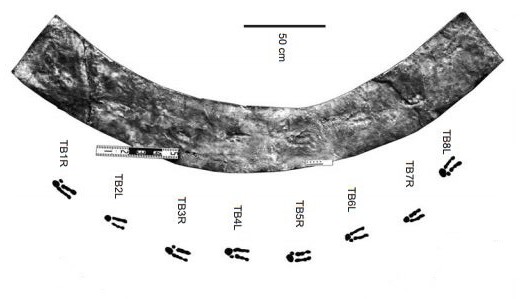
The top image from Abel (1935) shows a large theropod trackway with a toe missing on only the right footprint. The bottom image from Xing et al. (2012) shows that there is a toe “missing” on both left and right footprints. Both trackways show this as a repeated occurrence. When we see a toe repeatedly missing from one foot only, that is a likely candidate for a pathology. When we see a toe missing repeatedly on both feet, it was likely never there to begin with, as is the case with dromaeosaurs. In fact, a consistently missing digit II is one of the synapomorphy-based characters we can use to confidently identify a trackway as belonging to a member of Paraves.


We have also observed dinosaur trackways where only one footprint shows a missing toe, while all of the other toes are more or less impressed. Those occurrences are most easily explained by preservation, rather than injury or anatomy: not every footprint within a trackway is going to be beautifully preserved.

B. Limping versus Laterality
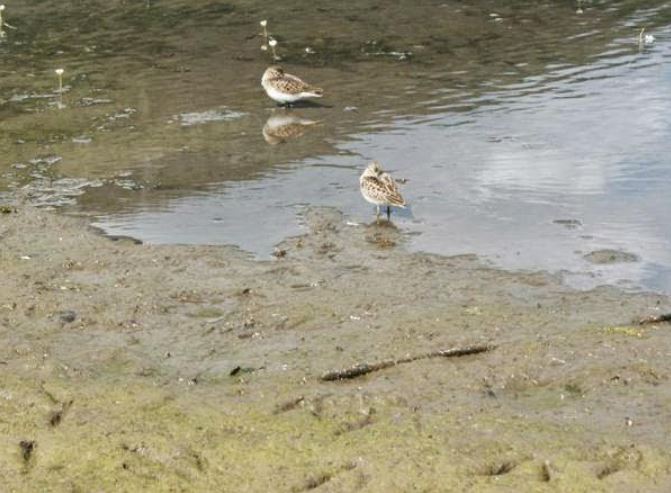
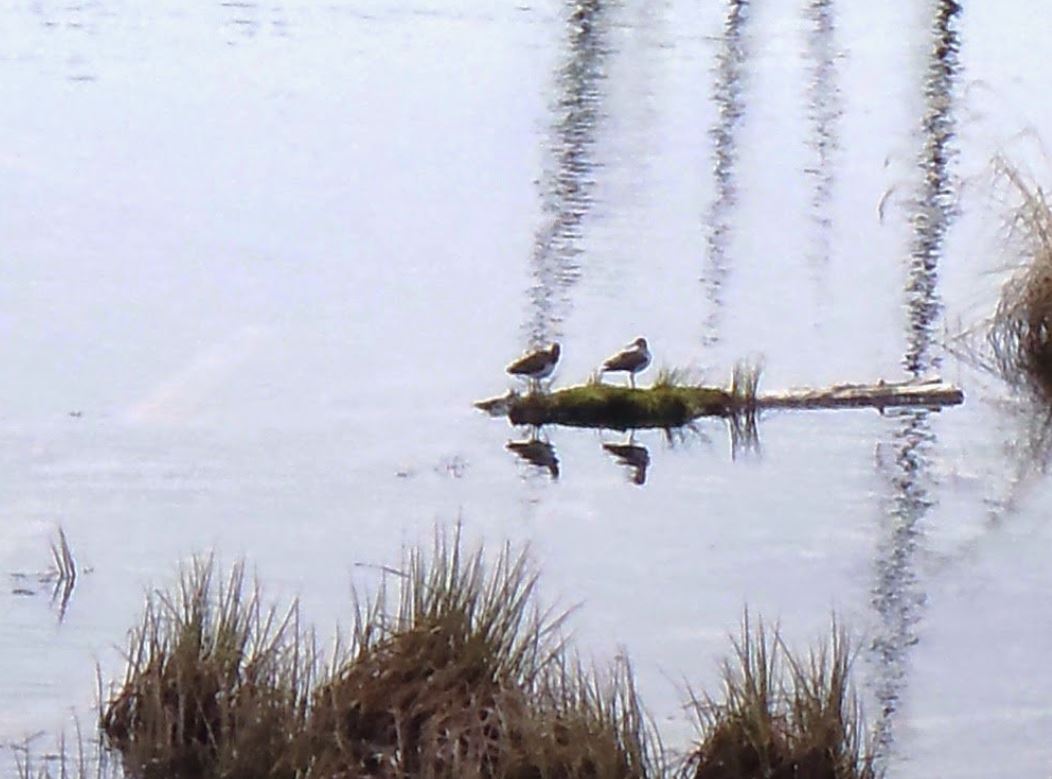
Remember before when I said that animals aren’t metronomes? It is not uncommon for perfectly healthy animals to favor one limb over the other. This might result in a trackway that looks like it preserves a limp. However, “limping” is a loaded term: it implies that there was an injury or defect that caused the animal to walk the way it does. Data collected from emus (Dromaius novaehollandiae) shows that emus may take longer paces when stepping off with their right foot than if they step off with their left foot (McCrea et al., 2015). In other words, emus are right-handed, or right-footed. Ostriches have also been observed to be a bit right-footed (Bachiodonna et al., 2010). These irregular walking patterns aren’t the cause of injury, but rather because of laterality.

C. Anatomical Anomalies

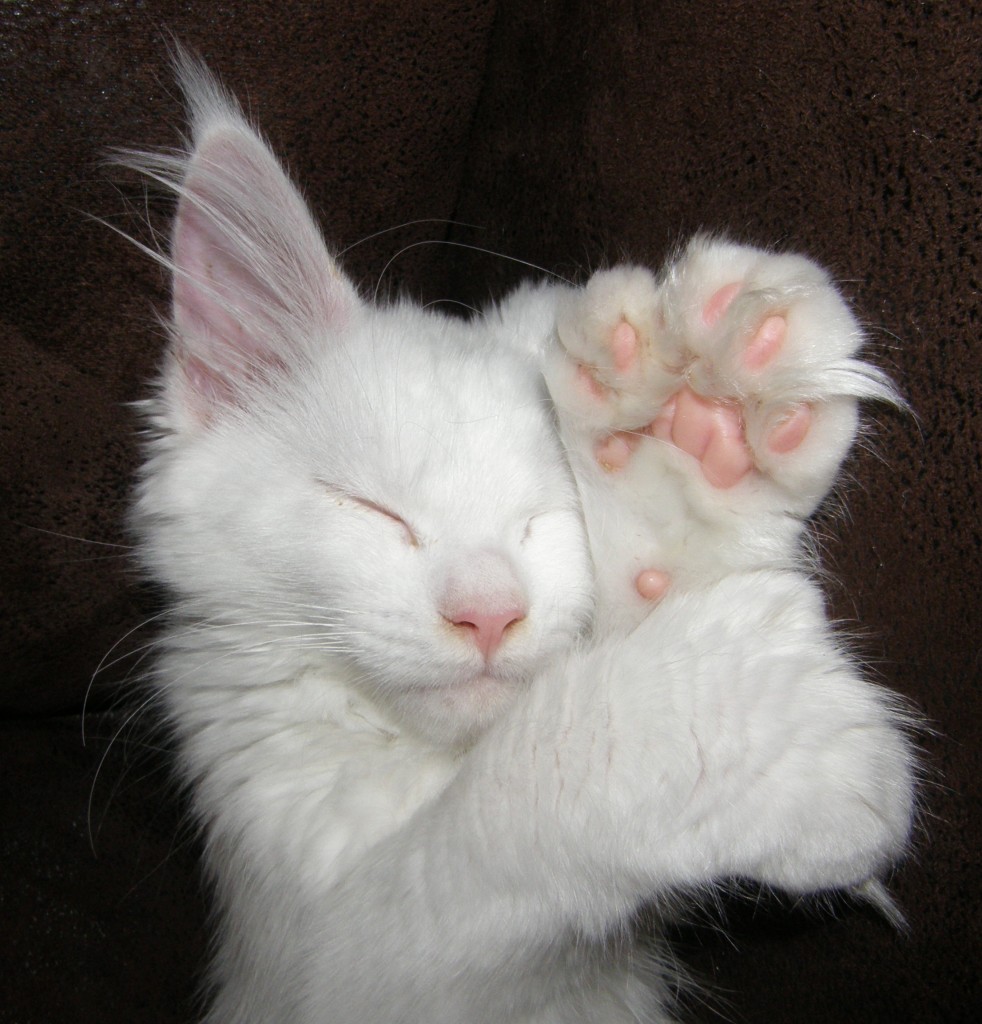
I have a few bizarre requests for the Universe in terms of cool fossils to be found. One is polydactyly in dinosaurs, or even in a fossil felid trackway. When I was a child my family adopted a polydactyl cat (also known as a Hemmingway cat). Charlie’s hands sported two extra digits each, while his feet each had one extra digit. If Past Me had known Present Me was going to be this much of an ichnology geek, Past Me would have taken pictures of his footprints. No matter how many toes a cat has, there are still features on the foot (and the footprint) that would make it easy to identify it as a cat footprint, like the tri-lobed metatarsophalangeal pad.

FLOOFY TOES! An image of a Maine Coon cat with polydactyly. Although Charlie was not a Maine Coon cat, this is what his forepaws looked like – each extra toe had a functional claw. From mcpolydactyl.com

Polydactyly is not as uncommon as one might think in the fossil record. Early tetrapods, specifically the early amphibians, that first started making their appearance on land in the Carboniferous had more than five fingers and toes on their hands and feet.

Transition of limbs from lobe-finned fish  Eusthenopteron (A, left) to early tetrapods Acanthostega (F) and Tulerpeton (G). Since hands and feet are modified fins, the trend from fin to foot involved digit reduction. By Conty (Own work) [Public domain], via Wikimedia Commons
Figure 4 of Niedzwiedzki et al. (2010), showing a laser scan (left) and a reconstruction of a Middle Devonian footprint from Poland. There may be up to seven digits in this footprint, with superimposed Ichthyostega (middle) and Acanthostega (right) foot.

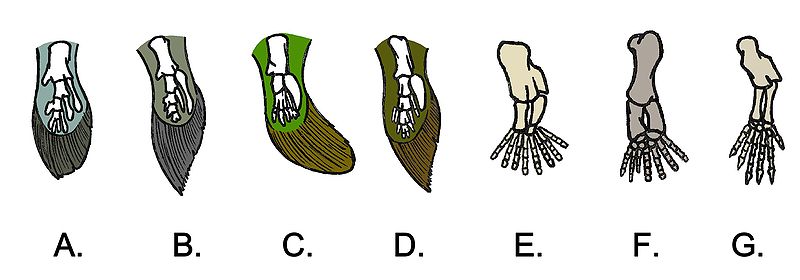
Let’s fast forward to the Mesozoic. Would we necessarily recognize polydactyly in the footprint of a more derived, specialized tetrapod, like a theropod? There are four-toed footprints that are attributed to theropods. Saurexallopus is interpreted to be the footprint of a theropod with four functional toes. The trackmaker was possibly an oviraptorosaur, such as Chirostenotes (Gierlinski and Lockley, 2013). Having a more well-developed digit I compared to other theropods that were running around at the same time (Late Cretaceous) was normal for Chirostenotes and close relatives, so this is a case of anatomy rather than polydactyly.

3D digital model of Saurexallopus cordata (McCrea et al., 2014) from the Late Cretaceous (early Maastrichtian) Peace Region of British Columbia, like other ichnospecies of Saurexallopus, has a well-developed digit I that impresses with the rest of the weight-bearing toes (digits II, III, and IV).

There are other trackway phenomena that can give the appearance of polydactyly. One of these is a really busy track surface. Busy track surfaces often show animals walking over the footprints of other animals. This often results in dinosaur (and bird) footprints that have the appearance of extra toes, when the simplest explanation is that the footprint is actually one footprint stepping on a different footprint. Another example is when a theropod (usually three-toed) sinks into a substrate deep enough that the hallux and the metatarsus will impress – it gives the appearance of a theropod print with “extra” toes. We see this at the Flatbed Creek Dinosaur Track Site in northeastern British Columbia, where these theropod footprints look like they have five toes instead of the usual three. One toe is indeed a toe – digit I (equivalent to our big toe) – but we don’t usually see that in non-avian theropod footprints. The other “toe” is the impression of the tarsometatarsus.

Flatbed Creek Dinosaur Tracksite, showing two theropod footprints that sunk into the wet, organic-rich ground deep enough to impress the hallux and the metatarsus (from McCrea et al. 2015). Bonus quiz: are these left and right footprints?

I think that if true polydactyly is to be recognized in theropod footprints, it will have to be in a footprint type that is well-studied and found in many different places, like Eubrontes. This is assuming that archosaurs (crocodiles, dinosaurs, birds) have high enough occurrences of a congenital anomoly like polydactyly in natural populations (in crocodiles it may be related to incubation at extreme temperatures – Google Books link). Polydactyly has also been documented in wild birds: follow this link for a report of polydactyly in a Domestic Pigeon.

Now For the Painful Stuff

You’ve seen some examples of what are not ichnopathologies. Now you get to be rewarded with the really painful-looking footprints and trackways…the ones that you look at and cringe because there is no way those injuries were not extremely uncomfortable. Here I will show the recent additions to the owie-ichnology literature. All of our examples come from non-avian theropods. Much like our modern hawks and eagles, Cretaceous theropods likely used their feet for much more than walking: the feet were also a means of prey capture and restraint (Tanke and Currie, 2000). Theropods led hard, fast lives, and that wear-and-tear showed up on their feet.

Those Cretaceous boots were made for gripping, tearing, and ripping all over you.

Despite all that foot use, wild modern birds of prey have a low occurrence of foot injuries: Bedrosian and St. Pierre (2007) documented a 14% pelvic limb injury rate in Red-tailed Hawks and American Kestrels. Like our modern birds of prey, foot-related injuries are not common in non-avian theropods. The percentage of injured theropod feet is small: Rothschild et al. (2001) observed that healed stress fractures in foot elements range from 0.3% to 6% in large theropods. Other injuries to theropod feet include bony growths that likely resulted from infection/osteomyelitis. So, as these injuries are uncommon in theropod foot bones, we can extrapolate that the resulting footprints from injured feet are uncommon. When we see an ichnopathology, we’re lucky (the trackmaker, however, was less fortunate).


1. Trackway Ichnopathology

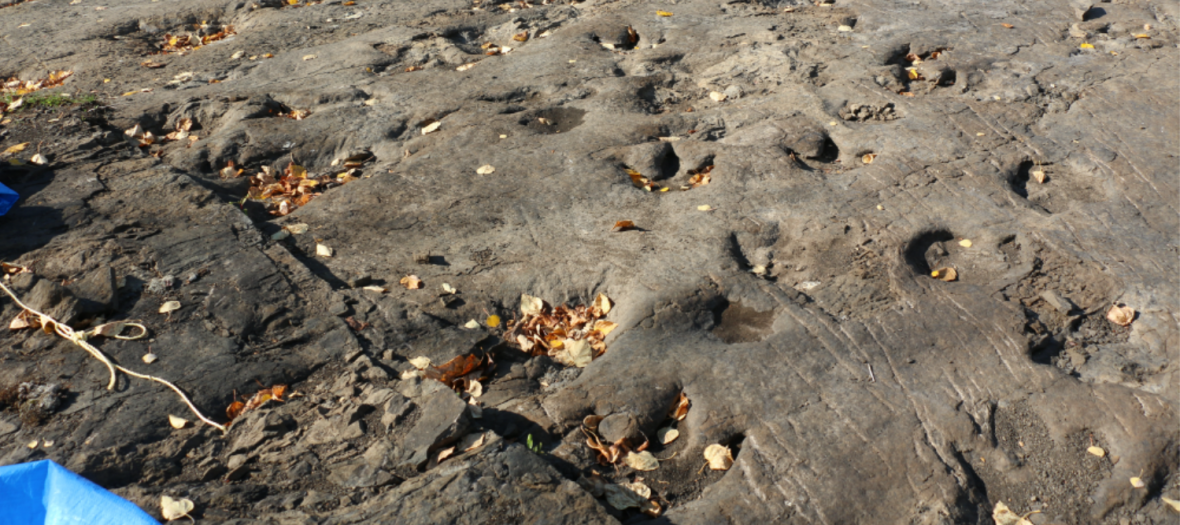
A trackway of a large theropod (cf. Irenesauripus mclearni) from the Early Cretaceous Gates Formation was reported to us. At first, we thought it might be one theropod following right behind another theropod because the steps the animal was taking were WAY too short.

Pigeon-Toed Waddling Gait in Irenesauripus mclearni, Early Cretaceous Gates Formation. McCrea et al. (2015).

We looked at the substate: it was firm when the animal walked on it, so it wasn’t simply having a tough time slogging through the muck. Then we noticed that the right foot was turned in much more than we usually see in large theropods: non-avian theropods tend to walk with their middle toes pointed roughly straight ahead, or in parallel with the trackway. This theropod was waddling. More specifically, this theropod was using a Pigeon-toed Waddling Gait. It’s hard to say if this gait was the result of an injury to the foot or leg, or if this was a developmental anomaly.

2. Swellings and Dislocations

The most “showy” injuries are those that involve swelling and/or dislocation of a toe. Theropods had no way to reset a dislocated toe, so it would have to walk around with that injury.

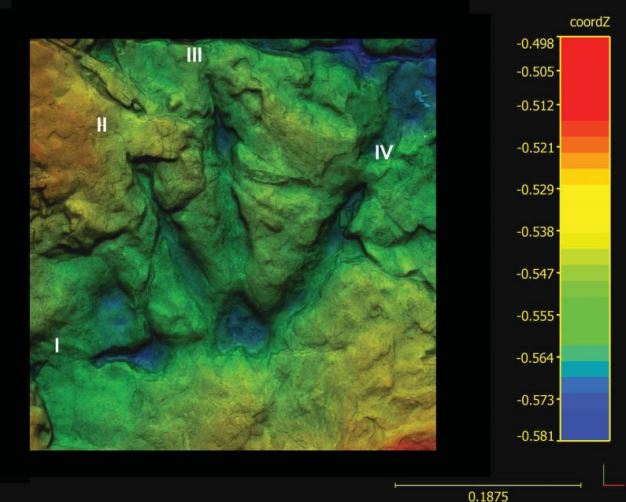
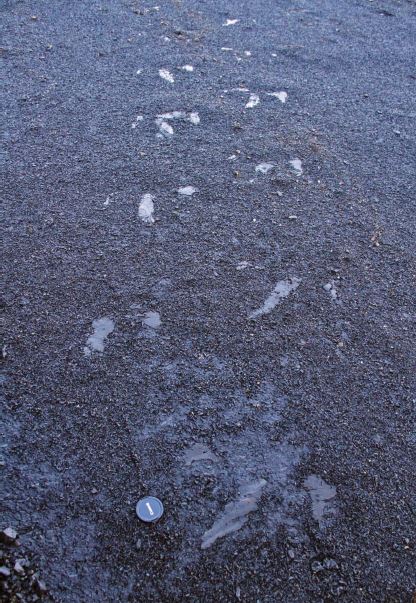
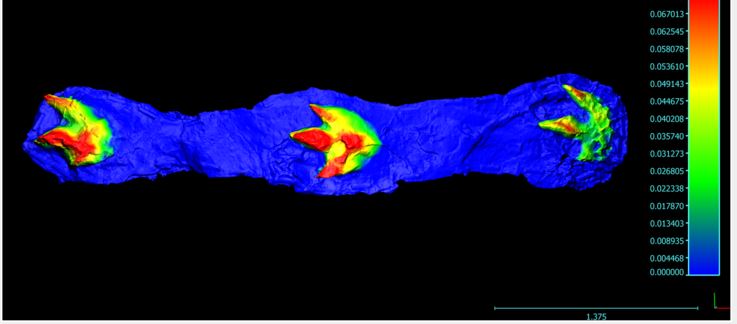
Here is a dislocation and swelling-related ichnopathology from the Dakota Group (late Early to early Late Cretaceous) in Colorado.


OUCH! From McCrea et al. (2015)

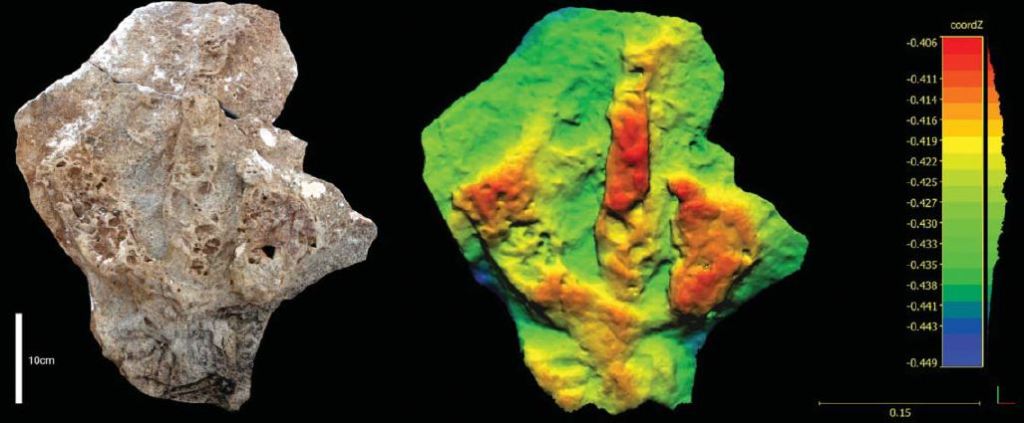
The second most striking dislocation injury I’ve ever seen in a footprint is this large theropod footprint from the Late Cretaceous (approximately 97 million years ago) Kaskapau Formation in northeast British Columbia. Not only is the middle toe (digit III) severely dislocated, but the outer two toes have seemed to compensate for this injury by spreading way out. Unfortunately, the Kaskapau and the Dakota Group pathological footprints were found as singletons. The good news is that, if these animals’ footprints are preserved elsewhere, we have a good chance of linking the footprints to their trackmakers.

Kaskapau Formation large theropod footprint, which we call “Broken Toe” among ourselves. McCrea et al. (2015)

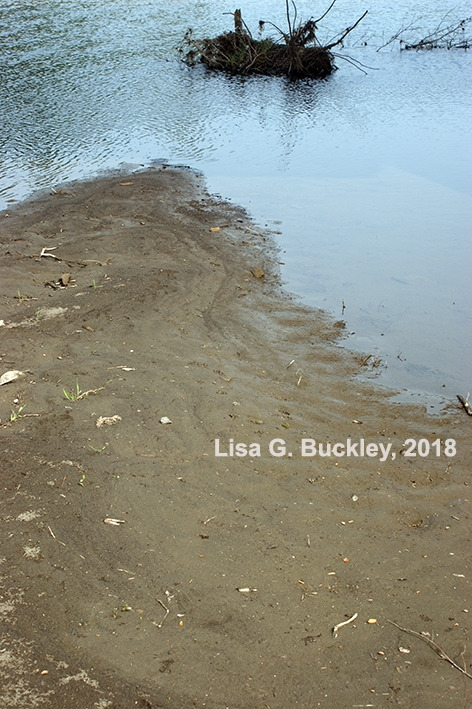
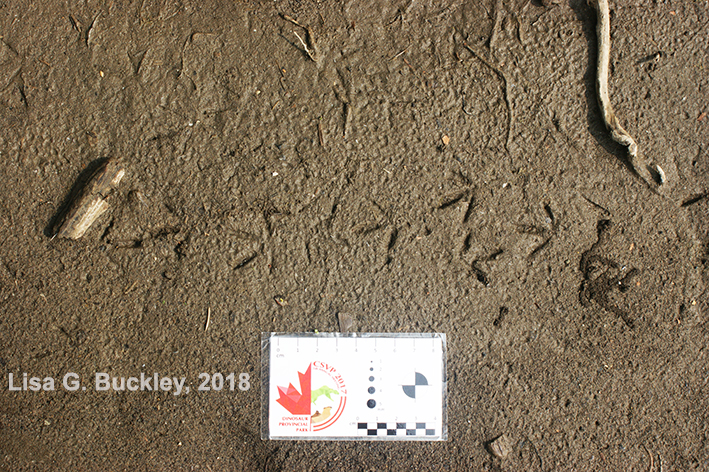
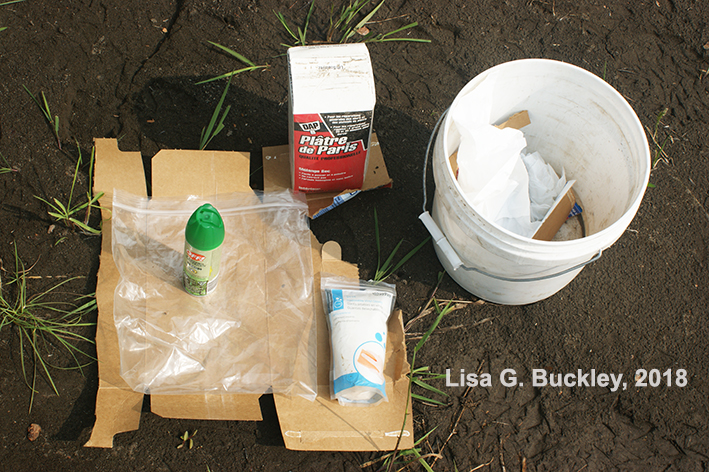
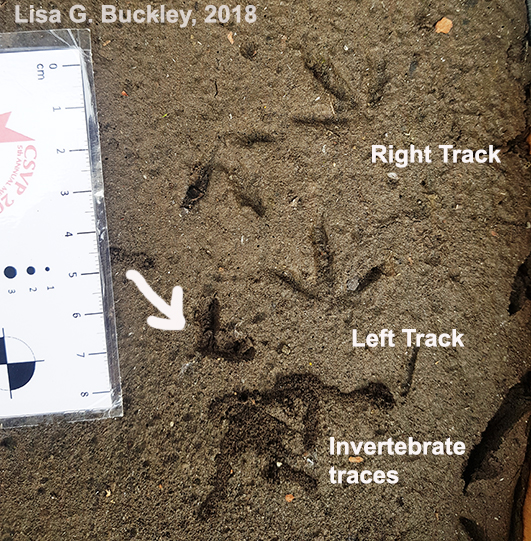
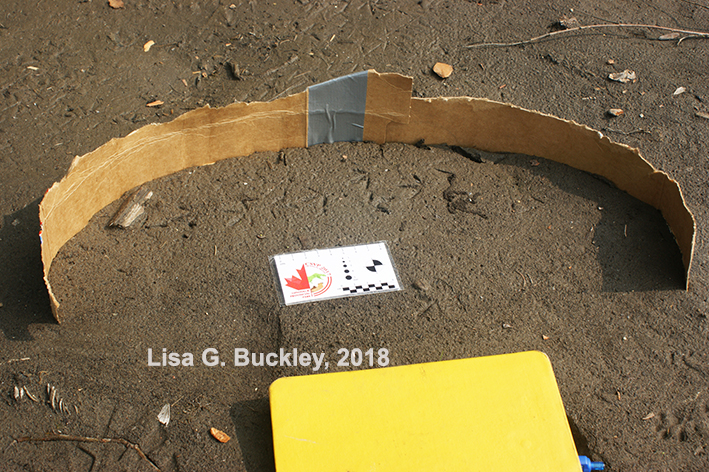
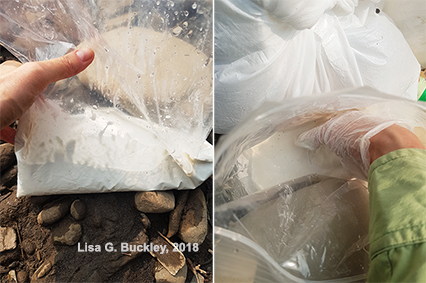
Footprint swellings like these are also seen in modern birds. Here is a Canada Goose trackway that I collected a couple of years ago. At the time I made the replica, the toe swelling was hidden by the muddy sediment, but it came out beautifully in the plaster replica.

Canada Goose trackway with a noticeable swelling on the outer toe (digit IV). From McCrea et al. (2015)

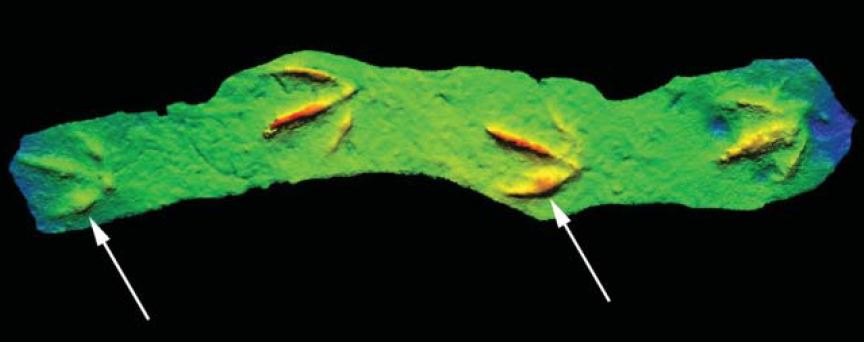
As painful as these two footprints look, they were a mere inconvenience compared to what this next trackmaker must have suffered. Check out this large theropod footprint (first reported by coauthor Darren Tanke) from the Late Cretaceous Wapiti Formation in northwest Alberta.

Unfortunately, this isolated footprint was lost in a landslide before it could be recovered. (McCrea et al. 2015) 

Yes, you are seeing that correctly: the animal, likely a tyrannosaur (based on the size, and shape of the toe claw, or ungual) stepped on its own toe. Check out how narrow the impression is right before the claw. This could be a trick of the preservation, or it could be that the tissue around the claw was necrotic and beginning to atrophy – this leads to the next level of ichnopathology, also related to tyrannosaurs.
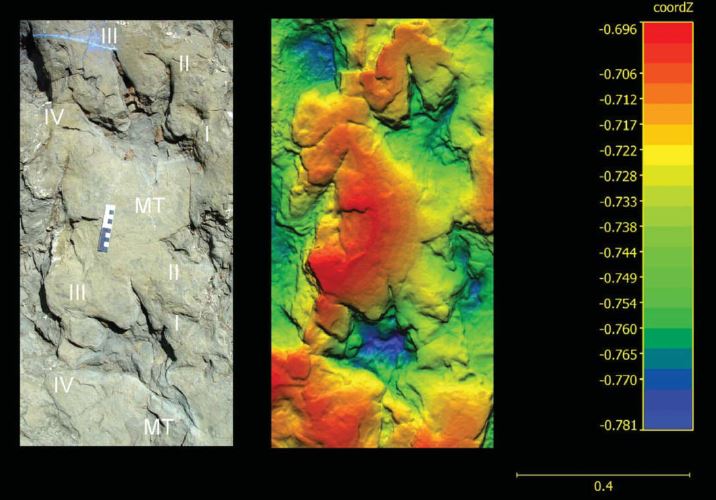
3. Amputations

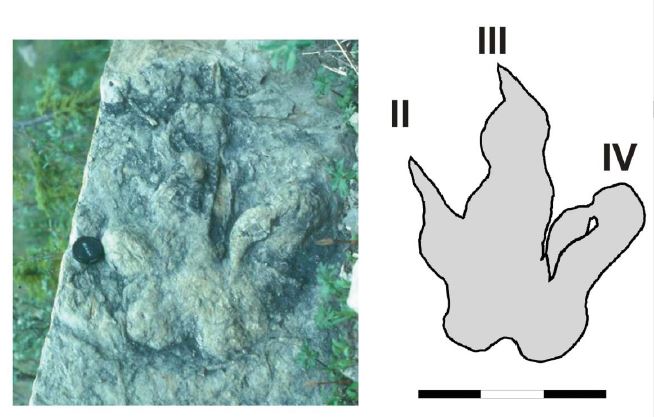
In 2011 a large theropod trackway consisting of three footprints was reported to us from the B.C. Wapiti Formation. On documenting the trackway, we noticed something peculiar: the inner toe on the left footprints was far too short, while the inner toe on the right footprint was a normal length. Not only did we have the first tyrannosaur trackway preserved, we had one with a rather nasty pathology – a missing toe!

Bellatoripes fredlundi, the first documented tyrannosaur trackway from the Late Cretaceous Wapiti Formation. There were two other trackways made by the same type of trackmaker, as well as a non-pathological footprint (the middle one), which made it possible to name this track type. Naming critters or their footprints based on pathologic specimens is a big no-no. Figure from McCrea et al. (2014)

An Ichnopathology Pain Scale

Everyone is familiar with the pain scale used in hospitals. Hospitals are like not allowed to use my favorite pain scale, courtesy of Hyperbole and a Half. Both these pain scales and all of these foot injuries made me ask “What would a theropod pain scale look like?”

So I dusted off my pencils, Googled horrible foot injuries in animals (there are things that I can’t unsee), and used the Bellatoripes fredlundi trackway and all of those horrible swellings and dislocations as inspiration for The Theropod Pain Scale.

Yup, I made this and it now occurs in the official scientific literature, and I have no regrets or apologies!

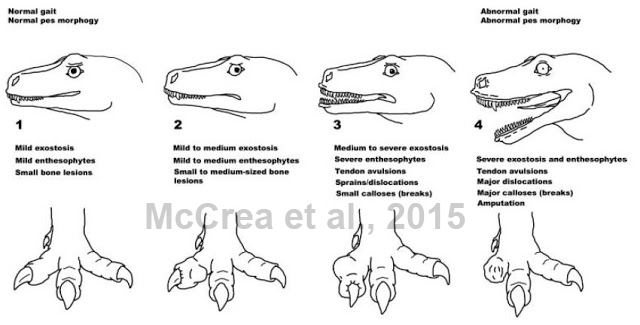
There are two reasons I am immensely proud of this image. First, looking at it made all of my staff simultaneously laugh and cringe in empathy pain for the poor afflicted theropod: apparently the lip quiver did them in (yes, I know the presence of lips is debated in archosaurs – the image was meant to have a touch of comedy in it). Second, it was published! The coauthors liked it, but that didn’t guarantee that the reviewers or the editor would have liked it. I’m glad they did – I do my best teaching and interpretation with humor.

The study of ichnopathologies, just like the study of tracks and traces, gives us a closer look at the complex biological lives of these now-extinct large theropods. Fossilized evidence of injuries reminds us of the fragility and vulnerability of animals often portrayed to the public as rough, tough, indestructible eating machines. Even the most fearsome predator has off days and oopsies. Ichnopathology research also demands that we make use of our living laboratory – outside – as an opportunity to look more closely at the common animal trackways we might take for granted. Each one is an opportunity to learn how an animal’s life is reflected in its footprints.

Owie and Ouchie References

Main paper: McCrea RT, Tanke DH, Buckley LG, Lockley MG,Farlow JO, Xing L, Matthews NA, Helm CW, Pemberton SG, Breithaupt BH (2015) Vertebrate ichnopathology: pathologies inferred from dinosaur tracks and trackways from the Mesozoic, Ichnos, 22:3-4, 235-260

Abel O (1935) Vorzeitliche lebensspuren. Gustav Fisher, Jena.

Baciodonna L, Zucca P, Tommasi L (2010) Posture in ovo as a precursor of footedness in ostriches (Struthio camelus). Behavioural Processes, 83, 130–133.

Bedrosian BE, St. Pierre AM (2007) Frequency of injuries in three raptor species wintering in northeastern Arkansas. Wilson Journal of Ornithology, 119(2), 296–298.

Gierlinski G, Lockley MG (2013) A trackmaker for Saurexallopus: ichnological evidence for oviraptosaurian tracks from the Upper Cretaceous of western North America, p. 526-529 in Titus AL, Loewen MA (eds.) A the top of the Grand Staircase: the Late Cretaceous of southern Utah. Indiana University Press.

McCrea RT, Buckley LG, Farlow JO, Lockley MG, Currie PJ, Matthews NA, et al. (2014) A ‘terror of tyrannosaurs’: the first trackways of tyrannosaurids and evidence of gregariousness and pathology in Tyrannosauridae. PLoS ONE 9(7): e103613. doi:10.1371/journal.pone.0103613

Niedzwiedzki G, Szrek P, Narkiewicz K, Narkiewicz M, Ahlberg PE (2010) Tetrapod trackways from the early Middle Devonian period of Poland. Nature 463: doi:10.1038/nature08623

Rothschild BM, Tanke DH, Ford TL (2001) Theropod stress fractures and avulsions as a clue to activity, p. 331–336 in Tanke DH, Carpenter K (eds.). Mesozoic vertebrate life: new research inspired by the paleontology of Philip J. Currie. University of Indiana Press.

Tanke DH, Currie PJ (2000) Head-biting in theropods: paleopathological evidence, in Perez-Moreno BP, Holtz Jr., T, Sanz JL, Moratalla J (eds.). Aspects of theropod paleobiology. Gaia, 15:167–184.

Xing L, Li D, Harris JD, Bell PR, Azuma Y, Fujita M, Lee Y−N, Currie PJ (2013) A new deinonychosaurian track from the Lower Cretaceous Hekou Group, Gansu Province, China. Acta Palaeontologica Polonica 58(4), 723–730.

Birds In Mud

Vote in the 2018 People’s Choice Awards: Canada’s Favourite Science Online!

Hello Dear Readers!

Science Borealis and their co-sponsor, the Science Writers and Communicators of Canada (SWCC) are excited to present the nominees for the 2018 People’s Choice Awards: Canada’s Favourite Science Online…AND BIRDS IN MUD WAS NOMINATED!

THANK YOU!

Seriously, thank you! I am honored that people think that what I have to say on studying fossil footprints (a.k.a. ichnology), and life in museums and as a palaeontologist matters. Studying fossils is really all about sharing their stories with the world, and I’m glad you like the fossil stories I’ve shared.

How Does It Work?

Each weekday between the Monday, September 17th launch and the close of voting on Saturday, September 29th Science Borealis and SWCC will feature one blog and one site across their social media channels. Each nominated blog/site will be featured once during the event.

If you’re on social media, follow the #CdnSciFav hashtag! You’ll see the nominated blogs appear there! This is also SciLit Week (Sept 17-21), so also follow the #scilit18 hashtag!

It’s a People’s Choice Award, so voting is open to you, Dear Readers! Vote for your favorite nominated blogs using the link below!

http://blog.scienceborealis.ca/vote-2018-peoples-choice-awards-canadas-favourite-science-online

I’m Totally Voting! What Do You Win?

Bragging rights!

If I win, I get a Winner badge for Birds in Mud, and a write-up based on an interview that gets posted on the Science Borealis and Science Writers and Communicators of Canada websites.

Really, everyone involved in science communication wins! We need science communication and science communicators. It’s tough but fulfilling work.  We need everyone who has that talent and means and opportunity to not only get science out to the people but to connect people to that science. You don’t have to study it to think it’s important or to care about it. Your work matters, Science Communicators! People are listening!

What Have I Written?

This is my new site for the Birds in Mud blog, and I am very proud of the posts I have up here. The bulk of the posts for Birds in Mud are over at my old site on Blogger. Below I have links to my top six favorite posts on the old site:

  1. Some of my science! Here are all of the things I have to consider when I try to tell a large fossil bird footprint from a small non-birdy theropod footprint. Theropod versus Large Bird?: http://birdsinmud.blogspot.com/2015/12/treading-ambiguously-theropod-versus.html
  2. Some more of my science! How we named a new type of Early Cretaceous fossil bird footprint! Introducing Paxavipeshttp://birdsinmud.blogspot.com/2015/03/early-bird-tracks-in-british-columbia.html
  3. Why the Commerical Fossil Trade is Elitism in Palaeontology – The Ivory Tower of Buying Fossils: http://birdsinmud.blogspot.com/2018/05/the-ivory-tower-of-buying-fossils.html
  4. What do Tyrannosaurus rex sounds have in common with ghosts? Read Sound Bites: Hearing a Tyrannosaurus rex to find out: http://birdsinmud.blogspot.com/2017/12/sound-bites-hearing-tyrannosaurus-rex.html
  5. Do you think it would be great fun to have a science communication pamphlet to hand to solicitors who ring your bell? I sure do! See my first (and so far only) Science Tracks pamphlet here! http://birdsinmud.blogspot.com/2017/01/strange-woman-presents-science-tracks.html
  6. Before you write a news article on how “absurd” a country’s/province’s fossil protection laws are, you might want to consider what’s best for the fossils. Responsible Fossil Stewardship: You Might Not Get To Do Exactly What You Want With Fossils: http://birdsinmud.blogspot.com/2016/09/responsible-fossil-stewardship-you.html

Enjoy the voting! Let’s spread that science communication joy!

Birds In Mud

How To Make Bird Track Casts

Hello, Dear Readers!

Part of the research that I do on Cretaceous-age bird tracks (a.k.a. individual footprints) and trackways involves me becoming very familiar with all kinds of bird tracks, not just the fossilized ones. Tracks and trackways of small creatures are ephemeral: they do not last very long because they are easily trampled or eroded away, or they dry and crumble, blowing away on the winds of time.

Most of the Cretaceous-age bird tracks that I study are the tracks of birds that were the Cretaceous-equivalents (paleo-ecologically speaking) of our present-day shorebirds and wading birds. These are birds that spent a great deal of time along Cretaceous beaches, lakeshores, and river banks, or that waded in shallow waters and left tracks in the soft, damp sediment (usually sand or silt.)

In a very general sense, Cretaceous-age shorebird and wading bird tracks have a lot of similarities with their present-day representatives. They are generally small, meaning they are less than 10 cm from the “heel” (which is really the metatarsophalangeal pad area, because birds walk on their toes only) to the tip of the middle toe. These tracks tend to have three forward-facing toes and sometimes have a single backward-facing toe. This foot shape is called “anisodactyl.” These tracks also have fairly narrow toe (or digit) impressions. We know that these Cretaceous-age shorebirds and wading birds strolled around in environments similar to our present-day shorebirds and wading birds (Kim et al. 2012 – Paradise of Mesozoic Birds.)

Our present-day wild shorebirds and wading bird populations and their environments provide a living laboratory in which to better understand how Cretaceous-age shorebirds and wading birds interacted with their paleoenvironments. So, how do I go about studying present-day bird footprints?

First, spend a lot of time sitting in shorebird environments, just watching birds from a distance. Watching from a distance is important: you don’t want to do too many things that will “weird out” the shorebirds. I want the birds to act as “normal” as possible so that their tracks and trackways are as “normal” as possible. I want to see how birds directly interact with their environment when they are going about their birdy lives. I also don’t want to harass the shorebirds. Although I do not chase or pester shorebirds, they do know I am there. How could they not notice that strange, chemical-smelling (from insect repellent) biped crunching around in the bushes? It’s just a matter of being as much of a non-entity as possible. Some species seem very relaxed with a large biped in their midst (Spotted Sandpipers). Some species will not appear until I either leave or spend several immobile hours observing (Solitary Sandpipers).

Sleepy birbs
These juvenile Spotted Sandpipers are comfortable with my presence after about an hour of me sitting on this river bank. You can see Canada Goose tracks in the foreground.

Second, I identify the birds that I see so that I know what is making the tracks. Part of my work is trying to link the trackmaker (the bird) to the shape of the tracks they make. The more precise I can get with the link, the more accurately we can say how many different types of shorebirds were running around Cretaceous-age shorelines. The more present-day bird tracks I can study, the better.

Solitary Sandpipers
This photo is an entry for #WorstBirdPic: these two Solitary Sandpipers were identified using binoculars.

Let’s jump to the “Hey, there’s a shorebird trackway!” moment. Shorebird tracks are finite phenomena, which is a problem for research: someone should be able to double-check my studies in the future, but they can’t if the trackways have washed away or crumbled to dry sand. I need a stable record of the tracks I measure. I’m only still learning the proper techniques for taking useable photogrammetry photos of small tracks (link to Bureau of Land Management PDF of Neffra Matthews work on digitizing track sites).

What I do is make plaster replicas of bird tracks.

[WARNING SIRENS SOUNDING] ICHNOLOGIST’S RANT: Do not ever, EVER, pour any kind of plaster into a fossil track. There are likely exceptions to this but those are case-by-case instances, and the action should be done by an experienced paleontologist. Every year fossil tracks are irreversibly damaged by someone using plaster. See this article about the tracks on Scotland’s Dinosaur Isle, and a similar case near Moab in Utah. Even if it is someone who simply wanted a souvenir,  actions outweigh intent, and the action is damage to irreplaceable heritage.

Why is plaster on a fossil track surface a bad idea? Fossil track surfaces are HARD. Plaster sets up HARD. Hard plaster does not dislodge from under hard rock undercuts, overhangs, and jagged surfaces. Here’s what happens: either the plaster cast gets stuck, breaks and remains inside the track, or the uneven parts of the track break and pieces are ripped up with the plaster cast. Please please PLEASE leave fossil track replica-making to the professionals. Support your local museums and purchase one of the track replicas they provide. [END ICHNOLOGIST’S RANT]*

*In case you are wondering, a version of these two paragraphs will appear in every post I write on using plaster on present-day tracks.

Now that we have a bird trackway to cast (this particular trackway looks a lot like a plover trackway, likely a Killdeer), we need a procedure for how to 1. successfully, and 2. CLEANLY make a plaster replica out in the wilds. You might be making casts in areas to which you cannot readily drive: you’ll have to hand-carry or backpack your equipment to the site.

Here are the steps I follow for one way to make a plaster bird trackway replica in the wild. Of course, this would work for the present-day tracks of other animals – you might need more or less plaster depending on the size of the tracks and trackway. One of the benefits of bird tracks is that they are small!

HOW TO MAKE A BIRD TRACKWAY REPLICA OUT OF PLASTER OF PARIS

  1. Find a shorebird-friendly environment! These areas may be very wet and difficult to walk on, so be careful not to sink in and get stuck! Find your bird trackway. Take lots of reference photos with a scale in the photograph.

SONY DSC
This area looks stable, but at least a meter away from the water’s edge was too wet and unstable to walk on without deforming the tracks.

SONY DSC
If the trackway is long, find a series of tracks that are clearly defined, or show interesting behavior (stumbles, trips, feeding traces, courtship or mating traces, landing traces, etc.)

2. Find a dry(ish) stable area to unload your track casting equipment! Equipment you will need:

  • A 3-gallon bucket. All of my casting gear will fit inside of this bucket, which then goes into my large backpack or I hand-carry it. This could also be used as your mixing bucket if you are sure that it doesn’t have any cracks or leaks. This bucket can also be used to scoop up water (if your casting area has available water).
  • Latex or nitryl gloves. Hand-mixing plaster is HARD on the hands: it can irritate your skin. It really dries out my skin and nails. Also, gloves can be taken off, whereas hands need to be washed (you won’t have a sink in the wild). Pro-tip: I use gloves that are one size too large so that I can easily take them off and put them back on. You can also use multiple pairs of gloves if you have them.
  • Dust mask. Plaster of Paris is very dusty. You do not want to inhale it.
  • Safety glasses. Learn from my mistakes, Dear Readers. I have glopped plaster into my eyes. An organic-rich stream is not a substitute for an eye-wash station. Also, a backpack eyewash bottle with clean water is a really good idea to have on you.
  • Garbage bag(s). This is essential since you want to keep your mixing area clean. Your garbage bag will be your containment system.
  • Plaster of Paris. This is your casting material. Pictured is a 2 kg container. For this project, I will end up using about 1 kg of dry plaster total (half the container). You can purchase this plaster in many hardware stores.
  • Plaster scoop. I used my hands on this trip, but a scoop (an old measuring cup works well) is highly recommended.
  • Ziploc-style plastic bag. This is your mixing bag. This is a nice flexible container in which to mix small batches of plaster.
  • Water. If your casting area doesn’t have standing or running water, you’ll have to bring your own. Plaster mix requires 2 parts plaster to 1 part water mix.
  • Cardboard, duct tape, and a cutting instrument. This is what you will use to make a dam to keep your plaster from spreading all over the place.
  • Strengthening fabric. This will be added to your second layer of plaster to add structural strength to the cast, as casts can be fragile. Materials that are best for making wild casts are strips of fiberglass matting (chop is VERY messy), burlap/jute, or cheesecloth. This time I used shredded cardboard – it worked!
  • Felt-tipped marker. You will want to label your bird track cast so that you know the who, what, where, and when of your cast!
  • Camera, photo scale, notebook. I always take reference photographs of bird tracks before I cast them. Once I make the cast, the original tracks are gone.

SONY DSC
Track casting equipment, clockwise from left: plastic mixing bag; cardboard for plaster dam and strengthening fabric; carrying bucket with a garbage bag inside; protective gloves. Not shown are the cutting tool, duct tape, notebook, felt-tipped marker, and camera. My water source was right next to me in the creek.

3. Label the trackway. The plaster cast is going to display a mirror image of the original tracks: what was in (a depression) will stick out, what looks left will appear on the right. It might be hard to tell what is a left track and a right track. I always choose one left track and scratch a small “L” for “Left” next to it. This “L” will show up in the final cast. That way I know for sure which tracks are from the left and the right, even if it looks reversed in the cast.

Bird track casting 6 - label trackway
Label the trackway. The white arrow points to the small “L” that I scratch next to one left track. The “L” will show up in the final cast and will help me orient the tracks in the trackway.

4. Make the cardboard dam. Cut strips of cardboard and tape the strips together to make one long cardboard strip. You can make it long enough to completely encircle the tracks that you want to cast if the ground is relatively flat (or if you accidentally mix your plaster on the runny side, which is OK.)

SONY DSC

5. Place your cardboard dam on edge on the track surface. If there is a slope to the track surface, place the dam on the downslope side of the trackway. Gently press the edge of the cardboard dam into the sediment – make sure you’re far enough away from the tracks so that you don’t deform them when you press the cardboard into the sediment!

SONY DSC
The cardboard dam is now set firmly into the track surface. No plaster shall pass!

*6. Set up the plaster mixing station. Put on your safety gear (gloves, mask, glasses). Plaster of Paris has the same consistency of flour: it is dusty and It. Gets. Everywhere. Here’s how to keep your mixing area clean:

  • Open up your big garbage bag so that it will act like a big bowl
  • Place plaster container and mixing bag inside the garbage bag inside the garbage bag bowl.

Now, any plaster that spills out of your hands or scoop will fall into the garbage bag rather than on the ground.

Bird track casting - scoop
CAREFULLY scoop Plaster of Paris into the mixing bag.

*7. Add water to the plaster. The recommended ratio of plaster to water is 2 parts plaster to 1 part water. You can measure it or eyeball it (I’ve done this so many times that now I eyeball it, but if you’re unfamiliar with plaster, I strongly recommend a measuring scoop.)

* Steps 6 and 7 can be reversed: you can also pre-measure out the water and add the plaster to the water. If you have a limited supply of either plaster or water, I strongly recommend using a measuring scoop so that you get the right ratio of plaster to water. It’s easy to accidentally add too much plaster to the water. From experience, it is better to make your plaster mix a little too runny. A runny mix will take a longer to set up, but it will capture all of the small details. If your mix is too thick, it may not settle into all of the small parts of the bird footprints. A thick mixture will also hold on to more air bubbles, which like to settle into the toes of bird tracks. Also, the thicker the plaster mix, the less time you have to work with it before it hardens.

Bird track casting - mixing
Add water to plaster (or plaster to water) and thoroughly mix. Use your fingers (WHILE WEARING GLOVES) to break apart plaster clumps.

8. Let the plaster soak into the water for a minute or two, then mix, mix, mix. You will want to make sure there are no lumps. Mixing plaster is a lot like using pancake mix.  I like to mix plaster with my hands (WEARING GLOVES) so that I can feel for plaster lumps and break them apart with my fingers. Don’t worry: I don’t mix pancake batter using my hands.

9. Once the plaster is thoroughly mixed, tap the bottom of the bag several times. You’ll see a scum of air bubbles form on the top of the plaster. These air bubbles are the bane of plaster casts. Plaster will set up around these air bubbles, creating pockets of space that don’t preserve any of the track details. Use your fingers or your scoop to skim most of the air bubbles off of the surface. You can dispose of the scooped foam in your garbage bag.

Bird track casting - air bubbles
Do you see the foam of air bubbles? Scoop those off of the plaster surface.

10. It’s plaster pouring time! Small tracks on a fine-grained surface (like sand or silt) can be easily damaged. You want to pour the plaster as close to the track surface as possible so that you don’t make any pour marks on the surface. You also don’t want to pour directly on to the tracks for the same reason. Pour the plaster so that it gently runs into the tracks.

Bird track casting - pouring
Pour plaster on to the track surface. Allow the plaster to gently run into the tracks. This is your Detail Layer.

11. You have finished pouring the Detail Layer! Once you have covered all of the tracks that you want to cast with plaster, it’s time to wait for the plaster to set up. There some factors that will determine how much time this will take. If it’s hot and dry out, you’ll be ready to add the next plaster layer in as little as 20 minutes. If it is humid, cool, and if the surface is very damp, you might have to wait as long as half an hour to 45 minutes. Keep an eye on the plaster: I’ve had the local wildlife try to “investigate” the plaster!

12. Once the plaster is firm, but still damp to the touch, it’s time to add the support layer. First, prepare your support fabric. I used shredded cardboard. If you’re using cardboard, burlap, or fiberglass mat, moisten it so that it is damp, but not soggy or dripping.

13. Repeat Steps 6 and 7 to make a fresh batch of plaster. Add your strengthening fabric directly to the plaster. Mix the strengthening fabric into the plaster until it is thoroughly covered.

Bird track casting - strength
Mixing the Strengthening Layer. Yes, I am using cardboard from a Friskies brand wet cat food box. #academicswithcats

14. Spread the strengthening mix to the surface of the Detail Layer. Since the Detail Layer is still damp, it will be fragile, so be very gentle. Cover the entire Detail Layer with the Strengthening Layer. Let this layer set until it is dry to the touch.

Bird track casting - strength 2
Add the Strengthening Layer. You’ll notice that the cardboard dam didn’t come into contact with the plaster, but it’s a good precaution to have.

15. Once dry (30 minutes to an hour), it’s time to write down all of the information you can about the bird track cast. This will help to supplement any of the notes and photos that you took. Here is what I write on my track casts (as long as my pen works – if the plaster is too damp, it will clog your felt pen):

  • Date,
  • Name of the bird,
  • Name of the area (or location coordinates),
  • Orientation to the waterway: upstream, downstream, shore side, waterside,
  • North direction,
  • Your name(s),
  • Any interesting details that you noticed in the trackway.

Bird track casting - label and dig
Labeled and excavated track cast, ready to lift!

16. Once the cast is labeled, it is time to remove it from the surface! The damp sand and silt will suction the track cast to the surface, so you’ll need to dig around and underneath the cast to free it without breaking it.

17. CAREFULLY lift the plaster cast from the surface! There will be a lot of sand and silt sticking to the underside. You can remove big chunks of this sand and silt, but wait until you get back to the lab/classroom/home to clean the surface. The plaster may still be damp and fragile underneath that silt and sand.

Bird track cast - finished cast
Your finished bird track cast! Well done!

18. Your track cast is successfully lifted…but you are not finished yet! Make sure that you pick up any small pieces of dried plaster that might have dripped on to the surface. Pack up all of your garbage and tools in your carrying bucket. Find a safe way to carry your plaster cast. I usually end up hand-carrying it, or wrapping it up in a spare shirt or jacket and carrying it in my backpack.

19. When you get your track cast home, let it sit for two to three days to cure. Curing is different from hardening. Curing allows for all of the extra water not used in the chemical reaction to dry off. After the cast has cured, you can actually use water and a very soft sponge to gently remove extra sand and silt from cast so that you can see the tracks. No scrubbing or scraping with hard bristles!

I hope you find this How-To useful! If you have any questions about making present-day bird (or other critters) track casts, please feel free to contact me through this website! If you think this activity would be great for a classroom activity or want to get involved with this kind of bird ichnology, please let me know!